woensdag 5 september 2012

The LYNX assembled!


Yesterday night I worked on the aspherical window, and I got the chance to put it in the tube together with all other optics. After collimation I got images that are at least very promising, and residual aberrations which now are in the range of 1/3 Lambda P-V will be corrected by local polishing. Testing will be done using an auto-collimation set-up.

Below some images of the current status, and a historical image of the prototype undergoing a critical review of the inspector.


It looks quite small here, but be careful, this is a 3 inch focuser and the eyepiece is one of the larger types (Ethos 13). If you really want to know how large it is, you could copy the picture and enlarge it using a beamer until the length of the tube on the image is around 750 mm. 

Now this focuser is a cheap one used only for testing purposes. In the meantime my friend Rob van Vreden is developing a great new focuser and he works on the mechanical design of the mirror-cell and secondary mount. Later this year we hope to be able to put the first set of optics in the new Carbon tube and to make the first astronomical images with the LYNX.

I'll ask Rob to tell a bit more about this new focuser, so hopefully you'll read more about it very soon.


zondag 2 september 2012

The optical design


Here is the lay-out of the optical system. The optical diameter was first set to 280 mm, but it appeared that 290 mm could be achieved without sacrificing on performance.


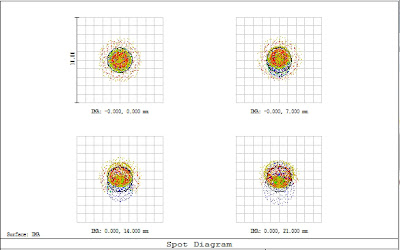
Below, the (matrix-) spotdiagram of the LYNX for a field of 42 mm diameter and a wavelength range of 450-700nm. The black circle indicates the diameter of the airy disc and the boxes measure 25 micron. Practically all the light is concentrated within the airy-disc, making it also attractive for visual observations.


But how does it look when all wavelengths are combined?


The plot above shows again the circle of the airy disc (blue light) and the spots for all colors combined at the same focus position. The boxes measure here 10 micron for comparison.


A short introduction

Why this Blog?
Just to share a bit of the joy of developing and building a new Astrograph. Don’t expect astronomical images yet, but one day this new instrument will show it’s full capabilities. And you’ll be the first to witness!
Let’s start with an empty tube… Well, not exactly empty but the image shows that the inspector looks quite happy with it.
 
 
This image was taken early this year, when the optical design of the instrument was finished and the glass blanks had been ordered.
 
First a short introduction to this new Astrograph:
The idea was born around 5 'o clock in the morning somewhere in the spring of 2011. Two hours later the optical lay-out of this idea was entered in Zemax and optimization could be started. The optical design was finalized in November 2011. That seems to be a long time, and in fact it is, but all design activities took place between the regular activities, like my work at Astron, playing football with the kids, cleaning the house, mowing the lane, spending time with my wife, building a pipe-organ and god knows what else...
 
Now for some tech-talk:
The optical design is based on a Newtonian lay-out, with a spherical primary mirror,  a field corrector near the focuser and a two-sided aspherical window. So, this instrument looks a bit like a Schmidt-Newton, but it really isn't. With an F/ratio of 2.5 it is an extreme fast system, with a corrected field of 50 mm diameter. Thanks to the special ED glass used for the field corrector and the unique interaction between this corrector and the optical window the instrument provides color free, diffraction limited images on a perfectly flat focal plane.
 
My next post will give a bit more information about the design and I'll present some ZEMAX generated spot diagrams.